
In this week’s continuation of my attempt to get better at makeup, I looked again to Snitchery… and a new foe.
No, I’m just kidding. We’ve never met. She’s very pretty.
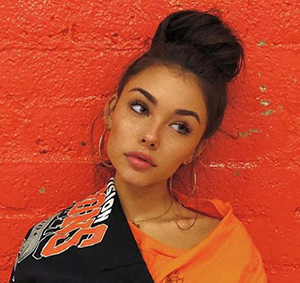
Madison Beer was discovered when she was thirteen, after Justin Bieber found videos of her singing on Youtube. Since 2012, she’s been slowly gaining media attention and an even larger Instagram following. Her Instagram account is listed before her Wikipedia page on Google Results!
I won’t lie: she has a very strong singing voice. Unfortunately (or not? Depends who you ask?), it seems her natural talents are being surpassed by her beauty. Slender, strong jawline, and that fox-eye that everyone (including me) uses makeup to manipulate.
Her face is so angular and strong, that attempting to recreate her face on my face is essentially like performing plastic surgery on myself using only brushes and makeup (and not, you know, a scalpel and some silicone).
For the past few months, I’ve been learning how to change up my look, how to go back to the office with a bit more of an elevated look, rather than just “awake”. Some of it has gone well, some of it has been cringe, and it’s all been fun and a lot to learn. Today’s dalliance was just… not great. At all. But, like everything, there’s a message hidden in it. That’s what today’s about now.
Without further ado, let’s get into the steps.
Notes before Procedure:
I typically list out the items that I use, but because I didn’t execute this look well, and didn’t love the materials I used, I would rather not list them.
The Procedure:
All credit goes to Snitchery!
- Primer (Snitchery uses Rare Beauty Primer, I do not)
- Bobbi Brown Vitamin Enriched Eye Base (apply eye base in under eyes for creasy eyes/bags)
- Fenty Beauty Illumination Foundation (Madison wears a Matte Foundation, but Snitchery prefers to use Illuminating and can mattify later) all over face.
- Carve out face with concealer!
A. Using a much lighter concealer, apply one stroke beneath each eye, going slightly up (towards the top of your ear)
B. Using the pointy side of the blender, take it up towards your temple.
C. Once blended, apply a small strip of concealer going vertically down your chin.
D. Apply a strip of concealer from the middle of your cheek down the center of your face (think diagonal line from the middle of your ear)
E. Apply a line of concealer down the bridge of your nose, from right between your eyes until you hit the curve of your nose
F. Blend up with beauty blender.
G. Add a DARKER CONCEALER (gasp) slightly above where you added the concealer from step D. Blend up and out.
H. Using the same darker concealer, add a line of product down across your jawline (think like you’re making a hill) to square off your jawline. BLEND THOROUGHLY.
I. Apply same dark concealer to the forehead, and blend down with the contour done in steps G.
J. Connect the end of the contour applied in step H (at the middle of your face, near the point of your chin) into the contour applied in step G.
K. Using the same dark color, add two small diagonal lines in the center of your cheekbone, and blend up again into the same area contoured in step G. - BAKING!
A. Set your face with setting powder light
B. BAKE: Add light powder heavily down your cheek, square up on your chin, and under your eyes. Think King Tut, a ventriloquist dummy, or Black Swan.
C. Complete steps 6 and 7, then come back!
D. Brush up and off the baking.
E. Add bronzer to where your contour is sitting on your cheek using a wide fluffy brush. Work it down towards your lips, and then up towards your temple.
F. Apply a small amount of blush at the top of your cheek bone.
G. With your finger, add small amount of highlighter onto top of cheekbone near the outer corners of the eyes. Add highlighter as well into the area just above the brows where the brows come into the nose, and then again slightly onto the cupid’s bow. - BROWS
A. Brush all your brow hairs up.
B. Wet an eyebrow brush, then using a brown gel, just start flicking up! Not too tall. Do not go below your natural browline. Occasionally use a spoolie to soften the look.
C. If your eyebrows are sitting a little low, take a natural concealer and gently apply beneath your brow.
D. Add clear gel going to the side, not up. - THE NOSE.
A. Draw a line from the end of your brow down side to the middle of your nose using a dark contour powder. Gently work the powder in towards the bridge of your nose.
B. Take powder up underneath your nose, to create a v shape on either side.
C. Close the V up in a diamond shape towards where your nose contour went in step A.
D. Surround and lightly fill that shape with a light powder.
E. Pat in with a brush. Don’t WIPE.
F. Carefully apply your lightest concealer at the top of the bridge of your nose (near the top of where your eyes meet your nose) going slightly below your eyes.
G. Add a small dot of the same shade from step F to the center of your nose, Rudolph style!
H. CAREFULLY PAT IN the concealer from F and G with your finger. - LIPS
A. Cover lips with foundation.
B. Using a rosey neutral color,draw a “U” shape, going under and up on the top lip.Fill in with the same color.
C. Using a darker color, go over that “U” shape again to bring in some definition.
D. Line your lower lip like you normally would, using the rosey color from step B.
E. Add a little bit of gloss, for moisture (Madison rarely does a matte lip)
F. Using TP or a cotton swab, wipe down some of the product to make it look more natural.
G. Optional: reapply that cupid’s bow highlighter, if needed! - EYES
A. Apply black shadow onto an eyebrow brush. Add a little wing, and connect to the middle of your eye.
B. Using the same brush and the same color, add tiny “wings” into the corner of your eye (bring it into the tear duct)
C. Using a black liner, line the entirety of your eyes. Tightline.
D. Soften underneath your eyes with same Bronzer used in 5E.
E. Apply mascara, bottom heavy.
F. Add a bright, light color right in the inner corner of the eye.
G. Use a rosy shade of eyeshadow and pop into the outer edge of the eye, then drag that color in. Keep it to the outer two thirds of the eyelid. Brush it out and up to the outer corner. Apply the same color beneath your eye (above the bronzer), about two/thirds of the way across the lower part of your eye.
Here’s where I went wrong:
- The concealer blending in step 4F came out more smudged, rather than a bit distinguished.
- Snitchery recommends using (for carving purposes) a liquid shade, rather than powder, because powders can build up and look gunky. She’s not wrong! In the past, when I’ve used powdered contour, I feel like while the sculpting worked, my acne scars were made prominent as a result. This time, I wasn’t prepared to contour with a liquid and a sponge in lieu of powder and a brush. It was obvious. I had also rarely contoured my jawline before, and didn’t succeed in preventing from looking like I had five o’ clock shadow.
- My brows did NOT want to be brushed up as indicated in 6A. I also used a brow pen, rather than a gel, and that did not help with the look.
- When attempting to contour my nose, I figured out that my nose was, as I predicted, a little bumpy (likely from a softball to the face when I was a kid). That made drawing down the sides of my nose a bit more difficult! Blending all the shapes and colors to look real was a whole other ballgame.
- I put my foundation on my mouth (as indicated in step 8A) while applying my foundation as part of step 3). My lips were dried out from that much product (and they were already dry today), and my lip color did not look right.
The Results:
| The Person | The Before* | The After |
| Madison Beer |  |
 |
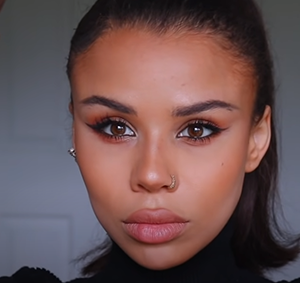
| Eleanor Barnes, aka “Snitchery” | 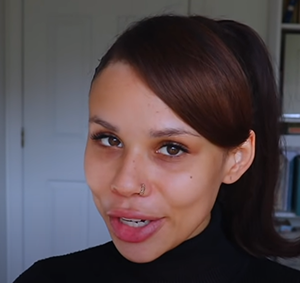 |
 |
| Me | 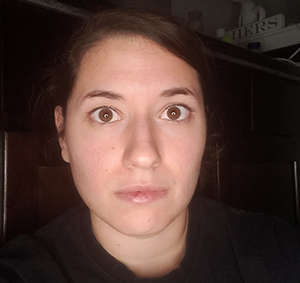 |
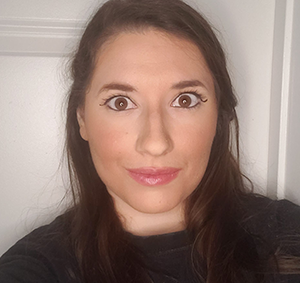 |
Analysis:
All in all, it was kind of a mess. My lips looked dry and off colored. I had a drawn on, not well blended, nose. My brows looked uneven. The poor blending of contour made my face look dirty.
Rather than take a picture and call it quits, I decided to attempt a fix. I grabbed my bronzer and a brush to balance out the borderline offensive contour. I added a bit of lip oil to my mouth and a neutral color to my eyes. The overall result was cleaner, and in certain lighting, nice! Nice, but nothing like Madison, nor Snitchery’s take on her look.
Conclusion:
I am great at looking like me. I am not great at looking like someone else. Truth be told, lately I’ve been more interested in natural looks. I want to be bare faced and look glowing, not tired! My eyes are bigger than Madison’s, and more misshapen than Eleanor’s (if you forgot, that’s Snitchery’s name IRL). I had fun attempting this, and I’m eager to improve contouring, but I couldn’t help but notice how clean my skin looked before and after my makeup. I am far from perfect, but I’m better off than where I started!
Coming Up Next:
Focusing again on my desire to have a no-makeup makeup look, I will be spending next week diving into brows (which I’ve put off doing for too long). In an ideal world, I have glowing skin, and need only put on a set of lashes and brows and a little lip gloss and I’m set. Granted, I could do that now, but I would be shrouded in useless insecurities. That’s a whole other journey that I need to map out, too!