

You know what the real “beautiful lie” is? Contouring your bone structure into a different bone structure.
I’ve declared my love, woman crush Wednesday, role model appreciation, however you want to slice it, for Gal Gadot’s portrayal as Wonder Woman at least once here, and at length everywhere else. I am all for discussions and critiques and thorough analysis, but I will defend any criticisms against her until my dying breath. However, my only basis has been from the two Wonder Woman films, and by watching her entrance in Batman vs. Superman on Youtube dozens of times whenever I need to get hyped up to do something. I had never actually seen Batman vs. Superman all the way through, because I was told it wasn’t that good.
Earlier this week, I made a blog talking about how even just little changes in my life have felt like a huge difference. This is a bigger change: I’m going to stop thinking about what others think and focus more on what *I* think, and eventually determine the balance between self-care and selfishness. It’s going to be a real hoot to watch that character development.
Anyway, I finally watched Batman vs. Superman last weekend and I didn’t understand what the fuss was about around it. People talked about it like it was a flaming dumpster, and it was fine! A fun three hours that left me on the edge of my seat and eager to see Justice League, which was re-released on Thursday. Is it the greatest movie ever created? No. Does it have to be? Also no. For what it’s worth, I love Henry Cavill as Superman. I loved Jesse Eisenberg as Lex Luthor! Ben Affleck makes me uncomfortable (maybe it’s Gone Girl. I don’t know. Shifty), but he did a great job being the older, grittier Batman that follows a career-defining depiction from top-tier Christian Bale. I support Amy Adams in everything she does, and I personally will break into the Academy to steal her an Oscar, considering she has been ROBBED every time she’s been nominated. Not to say the winners didn’t deserve an Oscar. They probably all did. I just think the fact that Amy Adams doesn’t have an Oscar yet is a diggity-darn travesty.
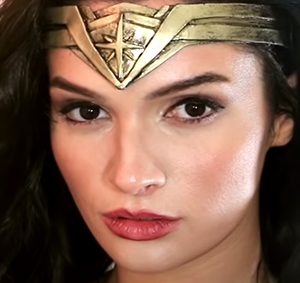
But yes, my love truly lies with Gal Gadot. I don’t have the words to express how much I appreciate the strength, grace, fearlessness, and depth she gives Diana Prince/Wonder Woman. Truthfully, her makeup covers it enough for me. The costume design team clearly went with a look that enhanced her natural beauty (her pure soul), and highlighted her strong features (defined jawline, high cheekbones, and intense eyes).
Alyson Tabbitha is a prominent cosplay artist, transforming herself into Mystique from X-Men, Lara Croft from Tomb Raider, and Jack Sparrow from Pirates of the Caribbean, among others. Her transformations are unreal!! She truly becomes the character. So when I saw her before/after photos of the makeup look she created for her Wonder Woman cosplay, I was floored. Granted, Alyson has a similar facial structure to Gal Gadot. Combine that with years of practice with a makeup brush and bam: flawless cosplay.
Because the look relies on Gal’s own natural beauty, the look itself isn’t unwearable in real life. In fact, with enough practice, it might even become my go-to night out makeup look! It’d combine my own natural beauty while simultaneously giving me the cheekbones and full lips of a former supermodel.
So, with my new set of Morphe brushes and a decently mapped out tutorial from Alyson herself, I went to work.
Notes Before Procedure:
The brushes I used worked great, but unfortunately, they aren’t the best brushes for contouring the face. They are an eye-specific kit, so I can’t fault them for not working just as well on a different part of the face! I will link them regardless, but I will likely get a different brush set for my next attempt that are more face focused. As well, Alyson links the products she uses in her tutorial, though I had to make some adjustments!
The Procedure:
My first makeup experiment had lasting effects: each makeup application is precluded by THIS primer process!
- Moisturize the face (I use Cerave AM moisturizer)
- Spray face with Pixi Hydrating Milky mist.
- Set the face with Laura Mercier translucent powder.
- Spritz the face with NYX setting spray.
- After setting spray dries, apply primer.
- Apply concealer after primer sets on all acne spots or dark spots.
- After two minutes, apply foundation!
These days, I’m not using foundation, but instead a Tarte tinted moisturizer that is truly magic in a tube. I apply it using my same beauty sponge!
Now for Alyson’s look:
- Apply a thin layer of foundation. Add another layer using a small brush to cover any shadows or imperfections.
- To accommodate the reshaping needed to match Gal Gadot’s lips, apply some foundation around the edges of the mouth as well.
- Cover your face with Bare Minerals powder foundation. I didn’t have this, so I instead used the item I used in step 3, which accomplished the same basic concept.
- Contour the face, using a deep grey/beige tone. Start with the nose!
- Go over the mid section of the nose on the sides to make it more narrow in the center.
- Define the sides of your nose at the tip to make it look sharper.
- Using a tiny brush, apply a thin highlighter down the center of the nose. Don’t go all the way up to the top or the bottom of the nose, just down the center.
- Blend!
- Add a little bit of shadow to the bridge of the nose to make it look more deep-set.
- Using features such as the top of the nostrils and the center of the eyes as guidelines, contour the cheekbones. REALLY try to make the cheekbones look higher up on the face!
- Contour the temples so the forehead doesn’t look as wide.
- Using the same dark shadow, add some shadow to your eyes to make them look more deep set. Further, drag the shadow outward and upward to connect with your temple.
- Add some shadow to the top of the nose to make the brow bone more prominent.
- Apply white shadow under the eyes to brighten.
- Add the same white shadow down the center of the nose, on the top of your cheekbones, over/around the mouth, down the center of the face, nose, and chin, almost in a V shape.
- Using that contour shadow, define the jawline to make it more defined.
- Contour the cheekbones again.
- Add bronzer for a more sunkissed glow on places where the sun naturally hits (the cheeks, across the nose, the forehead).
- Using a lipstain pencil, make a defined cupids bow on the lip. Neither the top nor the bottom lip are particularly wide, but the bottom lip is much fuller.
- After you get the shape right, fill it in with a lip pencil.
- Dark beige powder is making a comeback! Use it to define the cupids bow dimple. Blend.
- Use a tiny highlighter brush and light highlighter to make the cupids bow lines more defined.
- Define the lips more with a darker lip pencil and pat over it with the beige powder using your finger.
- Use a brown liner pencil to change the shape and blend it in. Use a brush to clean/blend.
- Using that same brown liner, draw small dots in the corners of the mouth, then blend up and down down to complete the pout. Use a highlighter brush to make it more defined.
- With a black eyeliner, dot where you will draw the arch of your eyebrows.
- Fill in your brows with hair-like strokes. Eyebrows get thicker at the arch and are somewhat close together as you get closer to the arch.
- Clean up with a lighter color as needed.
- Fill entire eyelid with a natural shiny brown eyeshadow. Drag upward and outward.
- Add the same color to lower lashline.
- Line upper lashline with black eyeliner. Go for a winged eyeline, but keep it SUBTLE.
- Tightline your bottom lashline to the middle with the same black eyeliner.
- Continue the line with a dark brown eyeliner pencil below the lashline. Use the same dark brown to elongate the tear duct.
- Use a light powder to clean up around the eyes.
- Highlight under the brow bone shadow and down the center of your nose.
- Add more contour to your cheeks, and blend.
- Touch up forehead contour to make it look smaller, then blend it all in.
- Apply a darker liquid liner to the top lashes.
- Curl lashes.
- Apply mascara generously on the top lashes, and gently on the lower lash.
The Results:
| The Person | The Before* | The After |
| Gal Gadot |  |
 |
| Alyson Tabbitha | 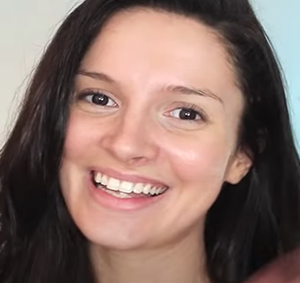 |
 |
| Me | 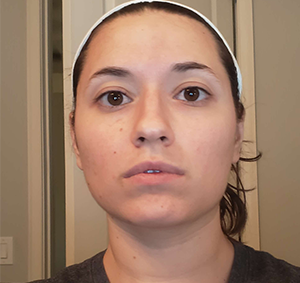 |
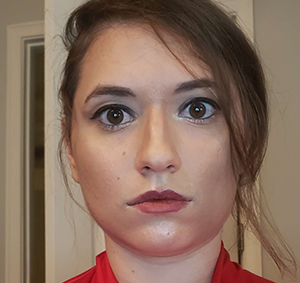 |
Analysis:
So, doing a dark grey/beige color for contouring was a terrible idea. I managed to fix it somewhat, but it made me look so ashy. I looked almost like a skeleton. However, OH MY GOSH. THE LIP CONTOURING. It was nearly identical! I couldn’t believe it! However, the formula for the lip stain must have changed in the past three years, because the berry shade looked way more purple than a somewhat more red/natural shade. Between the colors being off and not having the strongest hand with a contour brush it wasn’t exact, but it was a dang good start!
Conclusion:
Since the look itself is mostly natural with some enhancement, I don’t think this will be too hard to master. I need to work on my contouring, to be sure. That said, the last look I tried with lots of contouring was Madison Beer’s. Trying to match her jawline gave me five o clock shadow! This look gave me room to practice jaw contouring again, and this time, it wasn’t as big a disaster. Practice makes perfect!